Smarter home FAQs
Installation
Ready to start protecting your home from potential mishaps? It’s quick and easy to activate your smart home monitoring system with the Honey Smart Home app. You’ll also receive support prompts via email, and you can always refer to our Getting Started guide for helpful hints.
If you identify that the smart home sensor kit is defective, you must notify us within 7 business days. If you still need help, call us on 137 137 or email support@honeyinsurance.com
Smart home kit
Your smart home monitoring system
Your Honey smart home sensor kit contains your smart home monitoring system. Inside the box you will find:
-
A bridge to connect to your Wi-Fi network
-
3 multi-purpose sensors
-
1 magnet sensor to detect the opening and closing of sliding windows or doors
Requirements
Internet connection
Your sensors and the bridge require an internet connection via Wi-Fi. This is how the bridge connects to the sensors, and how the sensors can send you alerts to the Honey Smart Home app.
Check that your Wi-Fi router has a 2.4 GHz band for the bridge to connect to. Most modern routers have a dual-band setting that broadcasts both a 2.4 GHz and a 5.0 GHz band, and the bridge is only compatible with the 2.4 GHz band. You may need to access your Wi-Fi router settings to activate the 2.4 GHz band.
Electric power
You will need a power outlet to charge your bridge. The bridge is responsible for connecting your Wi-Fi to your sensors, and to your Honey Smart Home app, so it’s imperative to power it to stay active and online. If you incur a major power outage, let us know as soon as you can so we can take that into consideration.
Batteries
The sensors run off AAA batteries which are included when you receive them and will last approximately 1 year. When you need to replace them, we recommend alkaline batteries for Gen 3 sensors as they will last longer. If it’s your first time using a sensor, try moving the bridge around your home to a central location to help ensure all of your sensors can connect.
Location services
For Android: The Honey Smart Home app needs access to ‘location services’ and ‘location permissions’ to configure the bridge, but it only needs this access once during your initial setup.
During set-up you will see a screen, prompting you to turn on ‘location services’ and ‘enable location permissions’. Both requirements must be enabled before you can continue. Your location data will not be stored, until you enable ‘auto home/away’ mode.
For iOS: The Honey Smart Home app does not require location permissions to configure the bridge. The app will only store location and prompt for the correct location permissions if you choose to enable ‘auto home/away mode’.
Honey Smart Home app
Download the mobile app to your smartphone from the App Store or Play Store. Create your account and follow the instructions in the app to set up your system.
Bridge setup
Find a central location
We recommend plugging in your bridge in a central location in your home or property and free from obstructions like an entertainment centre, a couch, or walls.
Be aware of the bridge range
A single bridge can provide coverage for most single-family homes. Gen3 sensors have a range of 460 square metres (that’s roughly a large 3-storey house), however, the average home has many different sources of interference including construction and other wireless signals, so it’s best to be aware of that when placing your sensors. In some cases, extremely large homes may need an additional bridge. If after trying a few different bridge locations you can’t get things working, please contact us on 137 137 or support@honeyinsurance.com and we’ll work with you to get your sensors up and running.
Magnet setup
When to use the magnet
By adding the magnet to a sliding door or window task, your sensor will be able to detect when it is opened or closed, not just when it moves. Without a magnet, a sensor placed on a sliding door or window by itself can only alert you when the door or window has moved, not if it has been opened or closed.
The magnet on its own cannot alert you to any movement, it will only be able to work in tandem with a sensor.
The app will notify you when you need the magnet for installation.
Add the magnet to the sensor
You can only add the magnet when you add a new sensor task from scratch, or your sensor is already set on a sliding door or sliding window.
New sensor task
If you are installing the magnet as an accessory with a new sensor, simply follow the standard installation process for any other sensor. When you choose a sliding door or window task during installation, the mobile app will ask if you have an accessory. If you choose yes, the app will direct you on how to install the magnet and calibrate the sensor accordingly.
Existing sensor task
If you already have a sliding door or window sensor installed and you would like to add a magnet as an accessory, go to the mobile app to get set up.
- From the home page, click the ‘sliding motion task’ where you would like to install the accessory
- Scroll to the bottom and click ’add accessory’
- Then follow the in-app prompts to install the magnet and re-calibrate your sensor
Your sensor will now tell you when your sliding window or door is opened or closed, not just when it moves.
Place the magnet carefully
The magnet needs to be placed carefully to get the most reliable alerts.
- Make sure both the sensor and the magnet are level with each other. If the sensor is on a window and the magnet is elevated on the window frame, that may affect the accuracy
- Make sure that the magnet is perpendicular to the direction the sensor is going to move. For example, if your window moves up and down, the magnet should be horizontal. If your window moves left and right, the magnet should be vertical
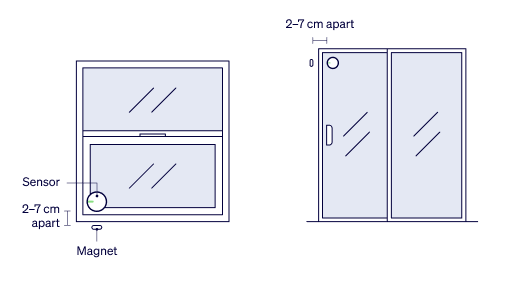
- When the door or window is closed, make sure that the magnet and the sensor are close together, but not touching. They should be at least 2 cm apart, but no more than 7 cm apart
- Make sure that both the magnet and the sensor are installed so that the logos on both pieces face the same direction
- Ensure you measure the correct positioning before securing your sensor and magnet on your window or door
Sensor setup
Select sensor locations
You can place your sensors on or near a variety of locations in your home, including water heaters, entry doors, garage doors, cabinets or safes, under sinks, washing machines and near smoke and CO2 alarms.
Avoid placing sensors where materials like brick, metal or concrete could block the connection to the bridge. For example, don’t place a sensor behind your refrigerator.
Refer to the Getting Started guide to see what will work best for your home.
Remove adhesive tabs
Do not remove the adhesive tabs to secure the sensors down until the app tells you to. They are designed to secure firmly for ultimate reliability, and removing them takes a bit of extra time and care. This also means if you plan to move them around regularly, think twice before removing the adhesive tab and sticking them down.
Avoid sensor interference
There are a few signs that will indicate your sensors are experiencing wireless interference:
- The app shows low signal strength on the sensors tab in ‘system settings’
- Your sensors often disconnect and reconnect on their own a few minutes later
- Your sensors might miss an alert every once in a while
- Installing your sensor might take a long time or you get an error that says your sensor is not calibrated after installing
Sensor testing
Motion
Once a sensor is installed on a door to detect the door opening and closing, testing the sensor simply means opening and closing the door. If you have not adjusted your notification preferences then you will get an alert any time the door opens.
Water leaks
To test your leak sensors, introduce a little water around the base of the sensor. The sensor will only detect the leak if water bridges the gap between the small brass pins on the bottom of the sensor. The sensor should send a notification almost immediately.
Smoke alarms
It is worth testing your smoke alarms alongside your sensor*. With the sensor installed, press the test button on your smoke or carbon monoxide alarm for at least 30 seconds. Your sensor will listen to the sound from the alarm within the 30-second window and will send a notification through the app.
* Your sensor does not detect fire, smoke or carbon monoxide and is intended to listen for only UL-listed smoke and CO alarms that are fewer than 10 years old.
Temperature
The sensor will begin reporting temperature as soon as it is set up. To test this function, simply check the home screen of your app to make sure the sensor is reporting a temperature.
Use
Changing batteries
Replace the sensor battery
To replace your sensor battery, follow these steps.
- Twist the sensor body counter-clockwise to remove it from the grey baseplate
- Remove the old batteries from the sensor
- Install new batteries in the sensor, following the guide in the compartment to ensure they are facing the correct direction
- Line up the arrow on the baseplate with the arrow on the sensor body, push the two halves together, and twist clockwise, all the way until you feel a click
We recommend standard alkaline AAA batteries for Gen3 sensors. Following your battery replacement, make sure your sensors are on and test that they’re connected to the bridge and reporting events correctly.
CAUTION: There is a risk of explosion if the battery is replaced by an incorrect type. Please think of the environment and dispose of used batteries by recycling wherever possible according to local disposal regulations.
Notification settings
At home, away or at night notifications
By default when you set up a new sensor or task, all alerts will be turned on. To adjust this, select the task that you want to edit from the home screen. There are three toggles at the bottom of the page, one for each setting. Your sensor will send an alert if any of the cases are true. For example, you might have alerts turned off when you’re home. But if you’re home, it’s night, and you have alerts for ‘night time’ turned on, then you’ll receive a notification.
To adjust your preferences there, simply select each toggle to change the setting. When the toggle is green, that means the notifications are turned on.
Home and away modes
By default, the Honey Smart Home app uses your phone’s location to determine how it should handle alerts notifications on your home and away preferences. If you would prefer to manually tell the app if you are home or away, from the home screen, click the top right corner where it says ‘at home’ or ‘away’. The toggle at the very top will adjust your preference for automatic home vs away switching; green indicates that automatic switching is turned on.
If you turn automatic switching off, you can use this same menu to change your status in the app. This way your phone will still know when to adjust alerts if you are home or away.
Night-time limits
In the app, click the gear icon and click where night time settings are listed. From there you can edit the start and end of ‘night time’ to whatever you prefer.
Remember, for each task that needs to send push notifications at night, you will need to turn on ‘Send alerts at night’ in the task details page.
System outage notifications
System outages occur whenever your bridge is disconnected from your home Wi-Fi network for longer than 10 minutes. You can determine if you want to receive a notification that your network is down based on your preference. To edit your settings, select on the ‘settings’ icon at the bottom of the screen. On the ‘notifications’ tab, click on ‘network outage notifications’ to toggle the option ‘on/off’.
Temperature format and temperature thresholds
Your sensors default to a simple range where you will receive a notification if the recorded temperature is higher or lower than your limits. To adjust the limits, select the temperature task that you want to edit use the settings there to set the upper and lower bounds.
The app can record temperatures in Fahrenheit or Celsius. To adjust your preference, select the ‘account’ icon at the bottom of the screen, then select on the ‘preferences’ tab at the top. Select your temperature scale.
Using your sensors for mould risk detection
How do I add a mould risk task to my sensor?
- Go to ‘system’ and select ‘sensors’
- Select the sensor then ’current tasks’
- Select ‘add task’
- Select ‘mould risk’
How does mould risk detection work?
Our mould risk detection is based on temperature and average relative humidity over time. It takes 10–14 days to calculate an initial reading of the mould risk in the area around your sensor.
The mould risk task detects when the area around the sensor is at risk for mould growth. It doesn’t detect mould spores in the air.
If you see mould growing, you should remove it immediately. Note that because we are detecting temperature and average relative humidity over an extended period, any actions taken to prevent or remove mould growth may not be reflected in the Honey Smart Home app for 1-2 weeks.
Mould risk task detects:
- Conditions around the sensor that are at risk of mould
- Temperature and average humidity over time
Mould risk task doesn’t detect:
- Mould spores in the air
- Mould risk away from the sensor area
- When mould grows
- Surface type or materials
Common rooms and surfaces with mould risk
Rooms:
- Poorly insulated rooms
- Poorly ventilated rooms
- Consistent moisture in a room
- Basements
- Attics
- Garages
- Bathrooms
- Crawl spaces
- Kitchens
Surfaces:
- Wood
- Paper
- Cardboard
- Ceiling tiles
- Drywall
- Wallpaper
- Carpet
- Fabric
- Plants
- Food
How to prevent mould growth:
- Dry water-damaged areas within 24–48 hours
- Control the moisture in your home
- Keep indoor humidity below 50%
- Use a dehumidifier or air conditioner
- Use a fan or open windows
- Direct water away from your home
- Clean roof gutters
Add a manager
How to invite and add a manager to your system
- Select ‘account’ and then ‘people’
- Select ‘add manager’ and then ‘grant manager access’
- Follow the in-app instructions
Once you’ve invited a manager, they’ll receive an email. They can follow the link in the email to download the app and create their account. When they’ve created an account, they’ll be prompted to accept your invitation and then automatically added to your system.
Managers can:
- Set their individual notification preferences
- Add or delete sensors and tasks
- Add or delete bridges
- Remove themselves from a system
Managers can’t:
- Add or remove other managers from your system
- Change the home or away status of your system
- Change the name or location of your system
- Delete your system Allowing someone access as a manager doesn’t change how you use your system. You’ll still get the same notifications about your home but now, so will your friends and family!
As the system owner, you’ll get notifications any time a manager adds or deletes a sensor, task, or bridge.
Troubleshooting
Wi-Fi issues
Why is my Wi-Fi not supported by the Android app?
If your wireless router is an older model, it may be set up to run on an old and outdated security setting known as WEP. If your router is set up for WEP security, go into your router’s settings and find the drop-down list of security options. Choose WPA2 and save your settings. WPA will work, however, WPA2 is more secure.
If you have an older router that doesn’t allow for WPA2 security, you may need to upgrade to a unit that does support WPA2 to use your smart home monitoring system.
To support your Wi-Fi network:
- Check your phone settings and turn location services on
- Confirm that your Wi-Fi router has a 2.4 GHz band for the bridge to connect
- Most modern routers have a dual-band setting that broadcasts both a 2.4 GHz and a 5.0 GHz band, and the bridge is only compatible with the 2.4 GHz band
- You may need to access your Wi-Fi router settings to activate the 2.4 GHz band
How do I check if my Wi-Fi router has a 2.4 GHz band?
For Android phones:
- From the ‘notification panel’ press and hold the Wi-Fi icon until you enter Wi-Fi settings screen
- Click the ‘network properties’ tab (the gear icon or menu icon)
- Depending on the Android version check:
- Read the ‘frequency’ setting – shows as 2.4 or 5GHz
- Read the ‘network speed’ setting – if speed is over 400 Mbps then you are using a 5GHz network
For iOS phones: We recommend you check your network through a computer. You can also obtain the information via your router settings following the instructions in the next section.
For Windows computers:
- Connect to the Wi-Fi network
- Open your networks panel from your taskbar (click the Wi-Fi icon in the bottom right)
- Click on ‘properties’ of your Wi-Fi network
- In the new window that opens, navigate to ‘properties’
- ‘Network band’ will either say 2.4GHz or 5GHz
For Apple computers:
- Select the Wi-Fi icon in the top navigation bar while holding down the ‘option/alt’ key
- You will see detailed information in grey about your Wi-Fi. In the middle it will show which channel your Wi-Fi is using
- Channel will either say in the brackets 2.4GHz or 5GHz
How do I change my Wi-Fi router settings?
First, find your router’s IP address:
- On a Windows computer, type ‘ipconfig /all’ into ‘command prompt’ and find the address next to ‘default gateway’
- On a Mac, go to ‘system settings > Wi-Fi’, select ‘details’ on your connection, and find the address next to ‘router’
Next, enter the router’s IP address into your preferred web browser (Google Chrome, Microsoft Edge, Safari, etc) and log in with the router admin username and password.
To find your username and password:
- Look for a sticker on your router with the admin login info. If it’s your home network, you may find the current Wi-Fi password on the actual router. The default password should appear as ‘Wi-Fi password’, ‘WPA passphrase’, ‘Wireless security key’, ‘Default password’, or any combination of those words
- Depending on your service, your modem (the device that connects your home to the internet) and router may be a single dual-function device. If your provider gave you two separate devices, the modem is the one connected to the wall jack – the W-iFi router will be the other device
- If you can’t find the login info on the router the default username is usually admin, and the default password is usually ‘admin’, ‘password’, or blank
You’ll be presented with your router settings – check that the security setting WPA or WPA2 is selected and that your bandwidth is set to 2.4GHz.
Sensor issues
What do the LED lights on the sensors mean?
The LED lights on the bridge and sensors are informative and give insight regarding behaviour.
Note: During normal operation, sensors will not flash any colours to preserve the battery.
- If the LED is green: this means the sensor has connected to the bridge, after you see the LED flash green the sensor will not blink again. Nothing to fix here!
- If the LED is red: this means the sensor is searching for the bridge. If this continues indefinitely, troubleshoot low signal strength
Why can’t I scan the QR Code?
Make sure that you follow the steps to scan the QR code on the sensor before you adhere it to a surface. If your phone is having trouble focusing on the QR code on the sensor, try the steps below:
- Make sure there is plenty of light in the room. Turning on the torch on the phone can help
- Place the sensor on a stable surface with a blank background; something like a table or counter-top
- Start with your phone about 10–13 cm away from the sensor, and try moving your phone closer to or further from the code to force your phone to adjust its focus
- If you’ve already stuck the sensor to a surface, then twist the white body of the sensor counter-clockwise to remove it from the baseplate. There’s a copy of the QR code to scan on the inside of the sensor
- If you’re using Android, download a 3rd party QR code reader app. Scan the code on your sensor, and when the app prompts you to scan again, click the upper right hand corner to bring up the menu. Select ‘manually enter ID’ and enter the sensor’s ID
After you scan the QR code, the app will check your sensor is awake.
Why isn’t my sensor waking up?
The sensor will have a green, plastic battery tab that prevents the batteries from powering the sensor. Make sure that it is fully removed before setting up your sensor.
When your sensor is awake, it will flash green once shortly after you pull the battery tab, but it will not flash after that to conserve the battery.
If you’re still having trouble, try cycling the batteries:
- Twist the white body of the sensor counterclockwise to separate it from the grey baseplate
- Remove the batteries and reinstall them
- When the batteries are reinstalled, look for the sensor LED light to flash
Why can’t I select a location for my sensor?
After you scan the QR code, you can either pick a default location or you can enter a custom one. If the app is not letting you pick a location, make sure you pick something unique that you are not currently using for one of your other sensors.
Why can’t I select the tasks that I want?
Each sensor is capable of the same possible tasks, but that doesn’t mean that a sensor can do everything at once. Different tasks require the sensor to be installed differently, so the app will not let you choose two conflicting tasks for one sensor. In general, the sensor can detect one motion task, the sounding alarm task, or the leak tasks. Then you can add the temperature task on top.
Why won’t my sensors calibrate?
After you’ve scanned your sensor and chosen your preferred location and tasks, the sensor will need to calibrate. At this point a lot of information is passed back and forth between the sensor and bridge. If the sensor is not calibrated then you might miss out on important notifications about your home.
Try a few steps below to make sure your sensor calibrates correctly:
- Make sure the sensor was not mistakenly added to your account. Select the ‘system’ icon in the app and navigate to the ‘sensors’ tab. Check to see if the sensor is listed there. If it is, click it, scroll to the bottom and click ‘delete sensor’ and try the sensor installation process again
- Make sure the sensor is awake during calibration. Try the steps above to wake up your sensor and make sure you see a green LED
- Move your bridge closer to the sensor and try calibrating again. You can move your bridge back after the sensor is calibrated
- Make sure your sensor is not blocked by anything that might cause interference during installation. This could include physical obstructions as well as other electronic devices that emit radio signals
Why does my sensor say ’conductivity error’?
Water is a good conductor of electricity, but there are of course many materials that can also conduct electricity. If your sensor is placed on a conductive surface, or there is conductive material between the brass pins on the bottom of the sensor, that may cause the sensor to think that a leak has occurred even if no water is present.
To troubleshoot this error, make sure that the brass pins on the bottom of your sensor are not in contact with anything that might conduct electricity. This might include any kind of metal or liquids that are not water. You can try:
- Thoroughly cleaning the pins and the area under the sensor
- Replace the foam adhesive on the sensor baseplate
- Put a small piece of cardboard or plastic under the sensor to further insulate the brass pins from the metal
Why aren’t I getting alerts from my sensor, even though my magnet is installed?
Most issues with the syncing of the magnet will be the result of the location of the magnet relative to the sensor.
If you are not getting notifications from your sliding window or door sensor with an accessory, then the accessory is too far from the sensor when the door or window is closed. Move the accessory closer to the sensor and re-sync the task.
If your task gets stuck reporting that your sliding door or window is stuck open, then the accessory is too close to the sensor when the door or window is closed. Move the accessory to about an 2.5 cm away from the sensor when the door or window is closed, then re-sync the task.
How do I fix low signal strength?
Every home is different, and what works for one might not work for another. Troubleshooting wireless interference can require a bit of trial and error, with contributing factors including walls, doors, electronics and competing Wi-Fi networks.
- Move your bridge to a few different locations around your home. Sometimes moving your bridge just one outlet over can make all the difference. Ideally, plug your bridge into an outlet that’s centrally located to all your sensors, though you may still have success if some sensors are slightly farther from the bridge than others to account for interference
- If possible, move your sensor to a different location. The same principles apply for sensors as they do for a bridge; a small change can make a big difference
- Any electronic device that emits a wireless signal, like cordless phones, bluetooth speakers or baby monitors, can interfere with your sensors. To limit interference from other electronics, unplug devices when they’re not in use. Or try moving your bridge away from big electronics
Why is my sensor disconnecting from the bridge?
If it’s your first time activating the sensors, try moving the bridge around in your home to make sure that it is close enough to the sensor.
If the system has been up and running for a while, check the battery level in the sensor and also make sure it hasn’t been obstructed by anything that could affect the wireless signal between the sensor and the bridge.
How do I reset and reinstall my sensors?
To delete your sensor:
- From the app on your phone, select on the ‘system’ icon at the bottom of the screen
- Select the ‘sensors’ tab at the top
- Select the sensor to view the ‘sensor details’ screen
- Select the red ‘delete sensor’ button
To reinstall your sensor:
- From the app on your phone, select on the ‘system’ icon at the bottom of the screen
- Select the ‘sensors’ tab at the top
- Select the green ‘add sensor’ button
- Follow the prompts to add your sensor back to your system
Note: Remember, if your sensor is stuck to a surface you don’t need to remove it to scan the QR code. Just twist the sensor body counterclockwise to remove it from the grey base plate to access the QR code inside the sensor.
Resync a door task
Occasionally sensors can get out of sync. When this happens, use ‘resync door task’ to get it back on track. This works on hinged doors, hinged windows, and garage doors.
How to resync a door task:
- In ‘home’, select the door task that needs to be resynced
- Select the ‘settings’ tab in ‘task details’
- Select ‘resync door task’ and follow the prompts to resync
It can take up to a few minutes, so you’ll get a push notification when it’s complete.
Why does this happen?
Your sensor has a small compass inside that detects what direction the sensor is pointing. When a battery is replaced, it can become magnetised and set to open.
It could also be that it’s too close to an existing security system that uses magnets. Before resyncing, move your sensor 2–7 cm away from the magnet.
Bridge issues
What do the LED lights on the bridge mean?
The LED lights on the bridge are informative and give insight regarding behaviour.
- If the LED turns green: This means the bridge is connected. Nothing to fix here!
- If the LED is fading in and out green or flashing blue: The bridge is trying to reconnect to the Wi-Fi on its own. See how to troubleshoot the connection here
- If the LED is red: This means the bridge is not connected to your Wi-Fi and you will need to reset it. See how to reset and reinstall your bridge here
Why can’t the app find my bridge?
- Is your bridge plugged in and flashing blue? If it’s red, we’ll need to reset the bridge.
- Did you plug your bridge in within the last 30 minutes? A bridge is only searchable for the first 30 minutes after it’s been plugged in. If it’s been longer than 30 minutes, or you see it flashing purple, simply unplug it and plug it back in before trying again
- How close is your bridge to your router? During the initial setup, it may help to move the bridge closer to your router
- Are location services turned on for your phone and allowed for the app to access? We need your home location during bridge setup so we can tailor your notifications if you are at home or away. Check your phone settings and turn location services on
- Confirm that your Wi-Fi router has a 2.4 GHz band for the bridge to connect. Most modern routers have a dual band setting that broadcasts both a 2.4 GHz and a 5.0 GHz band, and the bridge is only compatible with the 2.4 GHz band. You may need to access your Wi-Fi router settings to activate the 2.4 GHz band
See how to check your Wi-Fi router setting here.
Why can’t the app configure my bridge?
There are a few different issues that can cause errors in the bridge set up process. You might see different error messages, but the troubleshooting process is similar for each error:
-
Make sure that you are entering the correct Wi-Fi password for your network
-
Connect your phone to a 2.4 GHz Wi-Fi network. If you have a dual-band Wi-Fi router, you may need to forget the 5.0 GHz band
For iPhone users:
- Go to the Wi-Fi settings of your phone
- Turn off the setting that says ‘ask to join networks’
- At the bottom of the list of available Wi-Fi networks, find your bridge under ‘set up new device’. Select it there and follow the prompts
- At the end, go back to the app and follow through with the bridge set up process there to add the bridge to your system in the app
For Android users:
Depending on your device, the app may have trouble sticking with the bridge because it is trying to stay connected to the internet (the bridge does not have an internet connection yet).
To address this, try disabling smart network switching. Your phone may have different settings depending on the make and model of the device as well as your carrier.
Before attempting to configure your bridge again, try some of the options below:
-
Turn off the ‘smart network switch’
- From the Wi-Fi settings of your phone, select the three dots
- Select ‘advanced’
- Turn off ‘switch to mobile data’
-
Disable mobile data
- From the ‘system settings’ of your phone, select ‘connections’
- Select ‘data usage’
- Turn off ‘mobile data’
-
Use airplane mode
- Turn on ‘airplane mode’ on your phone
- Turn on Wi-Fi
- Confirm that your phone is connected to your home Wi-Fi network
After you have adjusted the settings on your phone, go back into the app and try configuring the bridge once more.
-
If the LED on the bridge turns green, that means it’s connected. If you continue to see errors after this, contact us for assistance.
-
If the LED on your bridge turns red:
-
Confirm that you entered the correct password for your Wi-Fi network
-
Check your Wi-Fi router settings to see if you have a firewall enabled. Disable your firewall or allow your bridge access. If you need information about the bridge’s MAC address to bypass your firewall, each bridge has a unique address that either includes 40E230 or 80A589. If you need information on the specific ports of your firewall to open, they are TCP port 5280 and TCP port 443
-
-
Make sure your W-iFi router is using WPA2 security settings
-
If your wireless router is an older model or if it has more settings, it’s possible that it is set up to run on an old and outdated security setting known as WEP. Currently the best standard setting is WPA2. If your router is set up for WEP security, simply go into your router’s settings and find the drop down list of security options. Choose WPA2 and save your settings. WPA will work, however WPA2 is more secure
-
If you have an older router that doesn’t allow for WPA2 security, you may need to upgrade to a unit that does support WPA2 to use your system
-
Why has my bridge disconnected?
Occasionally some bridges will disconnect from the internet for a variety of different reasons. You might notice your bridge blinking the LED to indicate some different activity. You might also notice that your bridge is removed or disconnected from your system in the ‘system settings’ page of the app. Follow the steps below to get your bridge back online.
If your bridge was previously connected to your Wi-Fi network, follow these troubleshooting steps:
-
Did you recently change your Wi-Fi name or password or any of the hardware in your Wi-Fi network?
-
If yes, reset your bridge
-
If no, continue to question 2
-
-
What is the colour and pattern of the LED on your bridge?
-
If solid green, continue to question 3
-
If flashing blue or fading in and out green, continue to question 4
-
If red, continue to question 5
-
-
If the LED on your bridge is solid green, go to the ‘bridges’ tab in the ‘system settings’ page of the app. Is your bridge listed there?
-
If yes, you’re connected and set up
-
If no, please reach out to support@honeyinsurance.com or call 137 137. Please have the seven-digit serial number on the back of your bridge ready for reference. The serial number starts with f0
-
-
If the LED on your bridge is flashing blue or fading in and out green:
-
Give your bridge a few minutes to reconnect to your Wi-Fi on its own
-
Unplug and plug your bridge back in
-
Move your bridge closer to your Wi-Fi router or adjust the orientation of your bridge
-
Reset your bridge using the instructions here. After you complete the reset you will need to delete and re-add your bridge. Go to your ‘system settings’ and find ‘bridges’. Select your bridge and then ‘delete’. Then go back to the previous page and ‘add new bridge’ and follow the prompts
-
If you cannot get your bridge to reconnect, please contact support on 137 137
-
-
If the LED on your bridge is red:
-
Unplug and plug in your Wi-Fi router
-
Reset your bridge using the instructions here. After you complete the reset you will need to delete and re-add your bridge. Go to your ‘system settings’ and find ‘bridges’. Select your bridge and then ‘delete’. Then go back to the previous page and ‘add new bridge’ and follow the prompts
-
How do I reset and reinstall the bridge?
Did you delete your bridge from the app and are having trouble adding it back? Resetting the bridge will make it searchable again.
Have you recently changed your wi-fi credentials? Resetting the bridge will allow you to enter new credentials.
To reset the bridge:
- With your bridge plugged into an outlet, press and hold the grey reset button to the right of the LED window for 10 full seconds
- Unplug your bridge for 10 seconds, and then plug it back in
- Now your bridge is reset and ready to be reinstalled
To reinstall the bridge:
- From the app on your phone, select ‘system’ at the bottom of the screen
- Select ‘bridges’
- Select your bridge to bring up the ‘bridge details’ screen
- Select ‘delete bridge’
- From ‘bridges’, select ‘add bridge’
- Follow the in-app prompts to reconnect your bridge to your 2.4 GHz Wi-Fi network
Once your bridge is connected, your sensors will automatically reconnect to your system.
How do I pair my bridge with new Wi-Fi?
Have you recently changed your Wi-Fi credentials? Resetting the bridge will allow you to enter new credentials. Follow the steps here to reconnect your bridge.
Water leak sensor conductivity error
Why does my sensor say conductivity error?
Your water leak sensors use the conductivity of water to detect if a leak has occurred. With the water leak task enabled, the sensor has an open electrical circuit that runs between the two brass pins on the baseplate of the sensor. When water is present, electricity can flow between those two pins and the sensor can detect that change, triggering the water leak alert.
If your sensor is placed on a conductive surface it may cause the sensor to detect a leak even if no water is present. To avoid this, if there might be an error with the brass pins, you’ll get a notification that says your sensor has a ‘conductivity error’.
How can I fix it?
To troubleshoot this error, check that the brass pins on the bottom of your sensor are not in contact with anything that might conduct electricity. Pick up the sensor and clean the pins before placing it back down.
You can also replace the foam adhesive on the sensor baseplate. If the sensor is placed on a metal surface, consider putting a small piece of cardboard or plastic under the sensor to further insulate the brass pins from the metal.
Additional support
I have a question about my sensors that I can’t find here
For any other questions not answered here, contact us to speak to our customer support team.
Smarter home
About
Why are smart home devices provided with your home insurance policies?
We believe that protecting your home starts before an accident even occurs. Many at-home accidents such as water leaks, fires and break-ins can be avoided by using the latest smart home technology. Avoiding these accidents can save you money and the inconvenience of needing your home fixed and contents replaced because something went wrong.
Is smart home sensor data used in the processing of claims?
No smart home sensor data is used in the processing of claims. The sensors are there to help alert you to potential mishaps before they escalate. That’s the beauty of the sensors, they’re able to let you know about door openings, water leaks, and smoke alarms, to help de-risk your home in order for you to claim less. They’re there for your safety, savings and peace of mind.
Are these sensors child and pet-safe?
We’re glad you asked. Like any piece of technology the size of your palm, it’s important to secure the sensors out of reach of children and pets. On the other hand, the sensors will be able to give you peace of mind that your children and pets are safer when installed in spaces where they play or sleep.
Are my sensors tracking me and listening to my conversations?
Your sensors are smart, but they’re not that smart. Nor would we want them to be. Your smart sensors are triggered by a rise or fall in your temperature thresholds, water leaks, and doors opening or closing. The only data collected is whether your sensors are active or inactive, so you can have peace of mind and make the most of your smart home insurance discount.
We also implement world-class security on the devices. This includes:
- End-to-end encryption for over-the-wire transmissions
- AES 256-bit encryption for all data transfers between the bridge and sensors (that’s the same level of security as a bank vault)
- OAuth 2.0 for client authentication (the same level of authentication that Facebook and Twitter use)
- Third-party security and penetration testing to validate systems are well-protected from attack
Can I get sensors with my contents insurance?
Right now, sensors are only eligible for those who take out a Home and Contents or Home policy. We’ll be sure to let you know if we extend the addition of sensors to contents and landlord policies.
Are there other smart home devices I can add to my policy?
Not just yet. We’re obsessed with improving our offering and bringing you the next generation of home cover and smart safety measures, so rest assured, if we identify anything new we’ll let you know.
Can I add my existing smart home devices to increase my discount?
We like your thinking! However, at this time our discount only applies to our sensors with Home and Contents or Home-only Insurance. We carefully selected these sensors as they can alert you to avoidable mishaps like fire, water damage and theft.
Can I buy additional sensors?
Your starter kit ships with sufficient units for the average Australian house. Interested in additional sensors for your home? We are working on securing an easy way for you to expand your coverage and will let you know when that is available.
How can you help if the app alerts me to a potential issue from a sensor?
What should I do if I need my sensors delivered to a different address?
We typically deliver them to the insured property. If for some reason you think that might be a problem, please contact us and we can arrange delivery to a different address.
What should I do if I need to change the date when my sensors are shipped?
If you’re buying a new home and taking out a policy, and are concerned your sensors might arrive too early, give us a call and we can reschedule your shipment date. We recommend you are in your home when your sensors are scheduled to arrive.
Smart Home Program discount
The information here relates to all new policies. For customers who purchased a home insurance policy with sensors before 20 May 2022 you can find your details of the Smart Home Program Discount here.
How does the smart discount work?
Once received, simply keep your sensors activated to keep the discount, year after year. If the smart home sensor kit is detected to be offline 28 days after receiving your sensors your discount will be removed for the remainder of your policy term. If you reactivate your sensors, the discount will be reapplied the next time we check your sensor status.
But don’t worry, we will keep you in the loop regarding if and when your sensors are active, and at what date you’ll become ineligible if your sensors remain inactive.
When do you start measuring my sensors?
We start measuring in the month after you receive your sensors, which is why we request their successful set-up within 28 days.
If I haven’t received my sensors, am I still eligible for my discount?
Sit tight, if your policy includes smart sensors you will receive a tracking number so that you’ll know when they should arrive. If you don’t receive your sensors according to the tracking, please contact us, by calling 137 137 or emailing support@honeyinsurance.com, and we’ll make sure we allow the extra time you need to get set up.
What happens if I don’t keep my smart home devices activated?
If we notice that your sensors are turned off or inactive, we’ll get in touch to see if there’s anything we can do to help get them going again.
How long do I have to install the sensors?
Once received, simply activate the sensors within 28 days to keep the discount, year after year. If your sensors are offline for a while you may lose the discount on your premium. In that case, simply reactivate the sensors and keep them online to start receiving your discount again and be better protected.
You will be sent reminders to set up your sensors during the 28 days. If your sensors disconnect after successful installation, after 2 days you will be alerted by the app and will receive emails to remind you to reactivate your sensors. If you need help with installation contact us by calling 137 137 or emailing support@honeyinsurance.com, and we’ll ensure your discount remains intact.
My smart home sensor kit doesn’t work, what now?
If your kit is defective please reach out to us so that we can identify and work with you to resolve any issues. You need to notify us within 7 business days of any problems with your sensors, by calling 137 137 or emailing support@honeyinsurance.com. Rest assured we’ll make sure we allow the extra time you need to get set up where there is a problem that has been identified.